

2025 © Allparts Equipment & Accessories. All Rights Reserved.
PP204 Rotor Kit with Rotor Blades and Insert, 1/2 in.
In stock
Part Number
PP204
$22.29
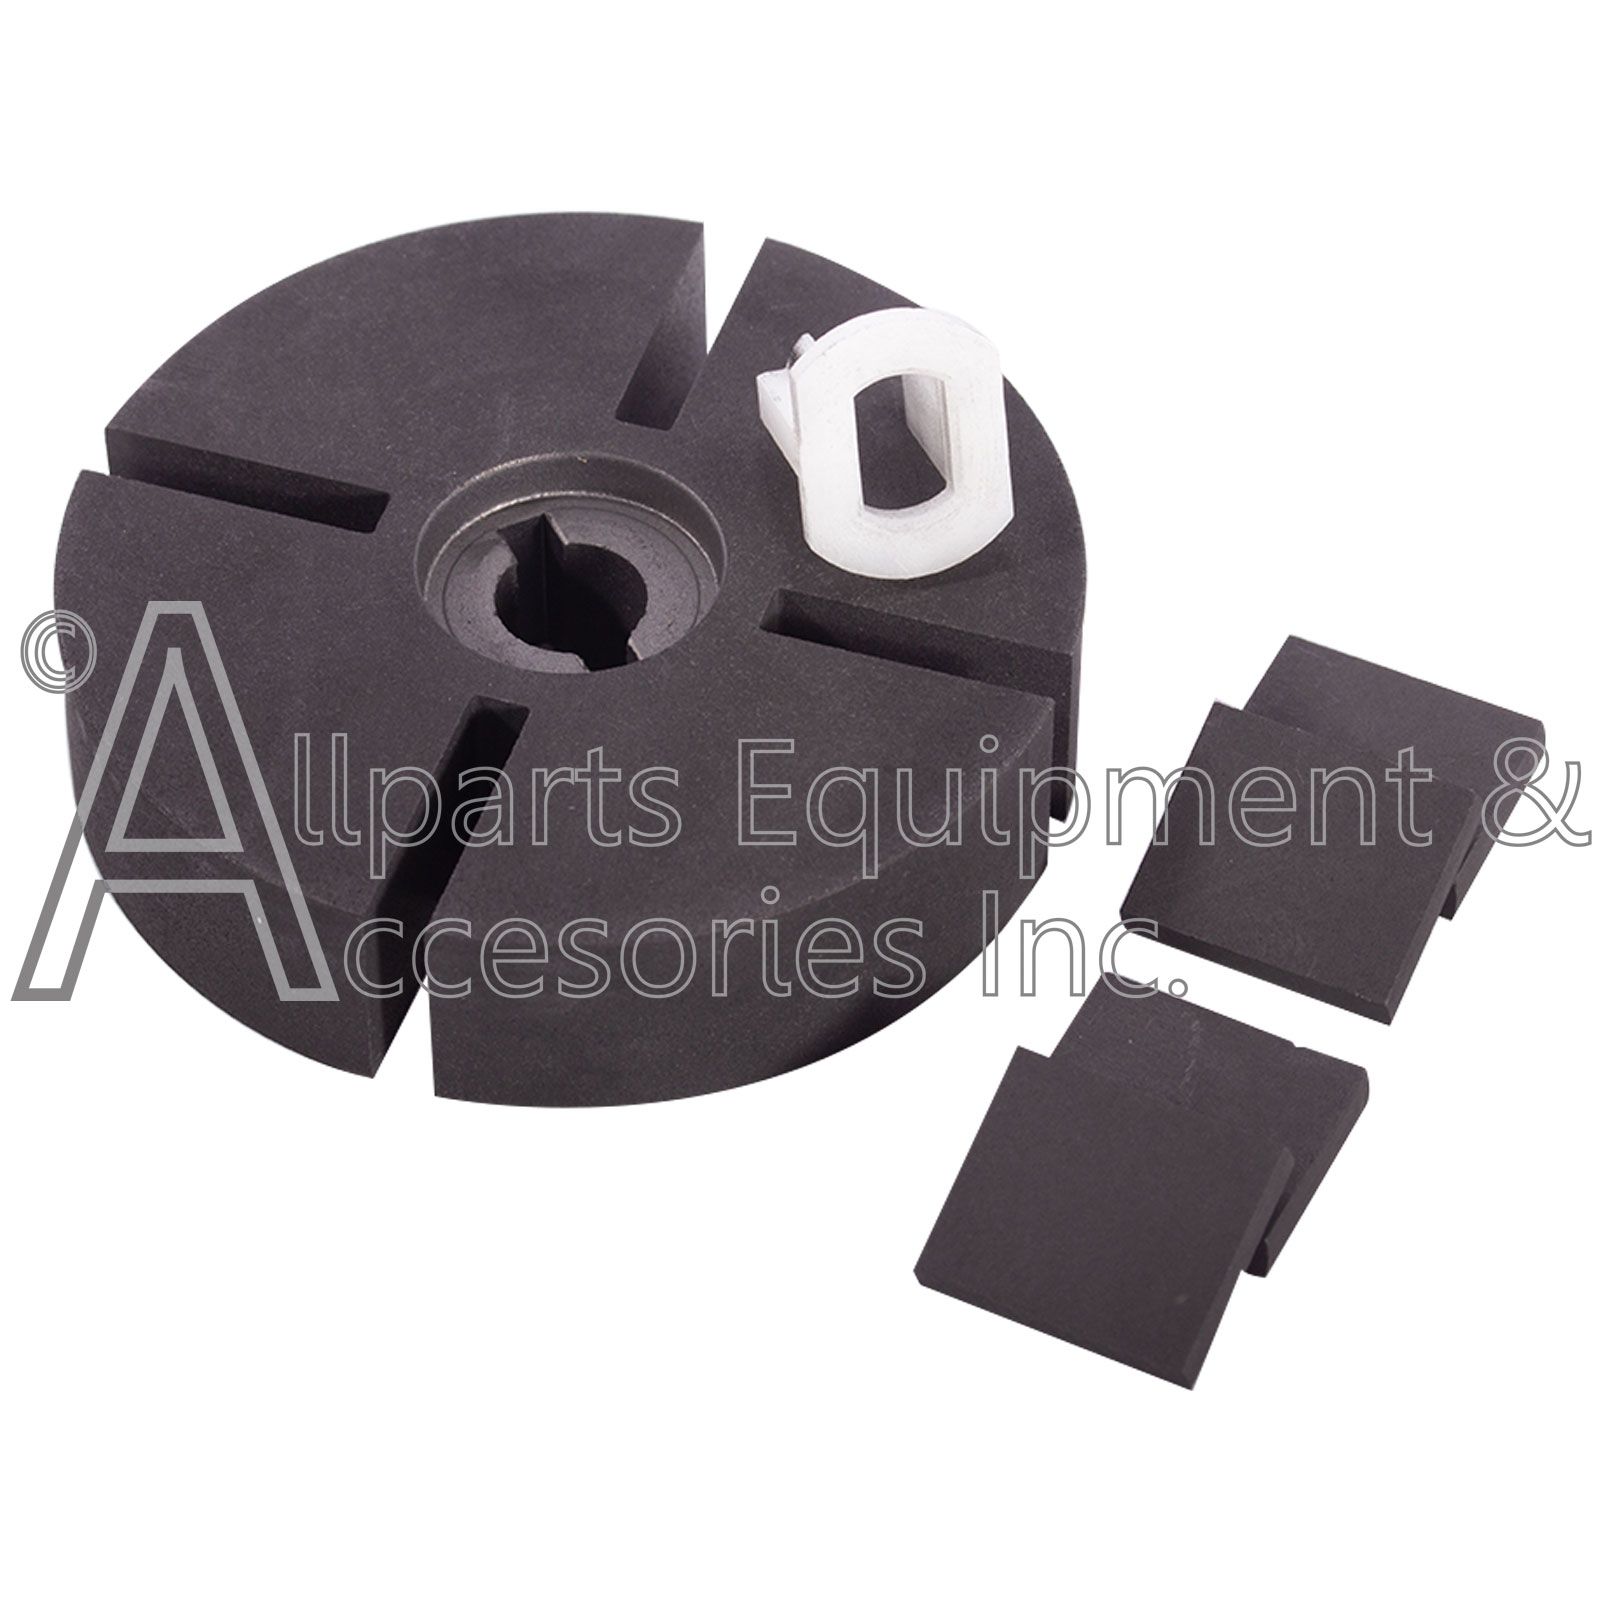
The PP204 Rotor Repair Kit is the heater's air pump assembly and consists of a 1/2 in. thick carbon rotor, a rotor insert, and four carbon blades rotating inside a pump ring body.
AMERICAN MADE FOR ACCURACY
Components Included in the PP204 Rotor Kit:
- (1) M22456-1 Rotor, Carbon, 1/2 in. Thick, Ø 21/8 in.
- (4) M8643 Carbon Blades
- (1) M22009 Insert, Plastic
The PP204 rotor is driven directly by the motor and is attached to the motor shaft by means of a plastic insert.
As the motor rotates, the carbon blades travel outward rubbing against the inside surface of the steel pump body.
The rotor's position inside the pump body is such that it is not concentric with the pump body and a .003/.004 of an inch gap is set at the uppermost quadrant.
As the motor rotates, the air between the blades is compressed and routed to the nozzle through the airline.
The carbon rotor blades will wear out after time and cause the output filter to fill with carbon particles.
Replacement of the output filter and carbon blades should be done on a regular basis.
PP204 Rotor Kit is the heater's air pump assembly. The PP204 does not pump any type of fuel to the nozzle it is an air pump and must be free from dirt and foreign materials in order to pump air properly.
This PP204 Rotor replacement kit consist of a 1/2 thick rotor, 4 rotor air blades and 1 plastic rotor drive insert.
It is suggested to replace the PP204 as a complete kit the help insure proper operation of you heaters air pump assembly.
The PP204 rotor is driven directly by the motor and is attached to the motor shaft by means of a M22009 plastic rotor insert. As the motor rotates, the carbon blades travel outward rubbing against the inside surface of the steel pump body.
These parts must remain clean and free from any type of foreign materials, lubrication, kerosene or diesel fuel.
The M22456-1 rotor's position inside the pump body is such that it is not concentric with the pump body and a .003/.004 of an inch gap is set at the uppermost quadrant. This is done by loosening the 2 phillips screws that hold the air pump ring to the back of the motor housing.
As the motor rotates, the air between the M8643 blades is compressed and routed to the nozzle through the air line.
It is also important that the filters are clean on the heater in order for the proper amount of air to be delivered to the nozzle in the burner head.
The PP204 / HA3004 Rotor Kit fits the following Reddy Heater models:
AC-165, R100, R100A, R100B, R110, R110BT, R110C, R110M3, R115, R115T, R150B, R150BT, R150D, R150E, R150M, R150M2, R155, R155A, R155B, R165, R165A, R165AT, R165T, R200, R200A, R200AT, R200BT, RE200T
The PP204 / HA30004 Air Filter Kit fits the following Master Heater models:
B30, B30C, B50, B50A, B50B, B50D, B50E, B50F, B50G, B50H, B50J, B55, B55T, B55CT, B60, B65, B65D, B66D, B70, B70B, B70BT, B70D, B70DT, B70ET, B99D, B100, B100A, B100AAK, B100B, B100C, B100D, B100E, B100F, B100G, B100KG,B110, B110A, B110B, B110BT, B110T, B115, B115CT, B115DT, B115T, B120, B125C, B140, B140D, B150, B150A, B150B, B150C B150CAK, B150D,B150F, B150FT, B150G, B150GT, B150H, B150J, B150JT, B150JT, B150KD, B150M,B155A, B155B, B155C, B155CT, B155DT, B155T, B165, B165A, B165AT, B165T, B165CT, B165DT,B200, B200AT, B200BT, B200T
The PP204 / HA3004 Air Filter Kit fits the following Remington Heater models:
REM100, REM100A, REM,110, REM110A, REM110B, REM11OBT, REM115, REM115T, REM150A, REM150B, REM150D, REM150E, REM155, REM155A, REM155B, REM165, REM200, REM200AT, REM200T, RH200VT, RHD200VT, RM115, RM155, RM20AT, RM200T.
The PP204 / HA3004 Air Filter Kit fits the following All-Pro Universal models:
PKC70ET, PKC115DT, PKC165DT.
The PP204/ HA3004 Air Filter Kit the following DESA, Knipco and Koehring models:
C35, C35A, C35B, C50D, C50E, C50F, C100D, C100E, C100F, C150D, C150E, C150F, F30, F50, F50A, F50D, F50E, F50F, F50G, F50S, F65, F65D, F66, F66D, F110, F110D,F110E, F110F, F110G, F110H, F120, F140, F150, F150D, F150E, F150F, F150G, F10H, F150S,K30, K50, K50A, K100, K100Aand many other older Desa International portable heaters.
Write Your Own Review
The following is service information for the PP204 Rotor Service Kit:
Note: It is important for the service technician to be cautious when working with the PP204 Rotor Service Kit, care should also be taken not to allow any type of oils, kerosene or diesel fuel to come in contact with the rotor or blades.
Broken Rotor or Blades
Disassemble the end cover filter and end pump cover from rear of motor. Visually inspect the rotor and blades to make sure none of the parts are damaged or broken. Make sure that the rotor and blades are free of any type of lubricant.
Never lubricate the rotor or vanes and only clean the rotor or vanes with Brake Clean. The rotor and blades must be clean and dry for proper operation.
Improper Rotor Clearance
Check rotor with feeler gauge for proper clearance (.003-.004) between rotor and pump body. Rotate rotor and make sure all four quadrants of rotor have adequate clearance.
Oversized Rotor
If the fan is hard to turn when the motor end cover is installed, but easy to turn when loosened, the rotor should be removed and lightly sanded. Remove the rotor and lightly sand by placing rotor in the palm of hand and sanding on a flat surface making figure eight rotations. (Use the finest grade of sandpaper available).
Pump End Cover
Always make sure to check the plastic pump end cover for any cracks or damage that would allow air to escape and not be directed to the nozzle. It is very common after time or from over tightening the plastic pump end cover for the cover to develop a crack. This small crack can prevent your heater from starting properly and running properly.
Rotor Replacement Instructions
WARNING: Never service heater while it is plugged in, operating, or hot.
Severe burns and electrical shock can occur.
1. Unplug heater.
2. Remove upper shell and plastic fan grill from heater.
3. Disconnect the air supply line from the rear metal pump end cover.
4. Remove plastic air filter end cover and air filters.
Inspect plastic cover for cracks or any damage that would allow air to escape.
If the cover is cracker or damaged replace the plastic air filter end cover.
5. Remove metal pump end cover.
Make sure to clean the pump side of the metal pump end cover with some steel wool or similar surface cleaner to allow for clean metal to metal surface contact when the unit is reassembled.
6. Remove the pump ring from the motor by removing the 2 Phillips screws.
Remove the carbon rotor, blades and plastic insert from the motor shaft.
Make sure to clean the pump ring and the back of the motor with some steel wool or similar surface cleaner to allow for a clean metal to metal surface when the unit is reassembled.
It is very important to make sure all metal surfaces have been thoroughly cleaned and prepped for reassemble.
All surfaces are metal to metal contact and must be free from and corrosion, dirt or debris before reassembly.
Do not oil or lubricate the carbon rotor or blades! You may use Brake Cleaner only to clean the rotor, blades and pump housing of any dust or debris before reassembly.
7. Now install new rotor with the plastic insert facing the motor.
Do not use any type of sealant when reassembling the air pump assembly.
8. Install the pump ring body and 2 Phillips head screws.
Adjust the gap between the top of the rotor and the pump ring body to .003 to .004 and tighten pump body.
Turn the motor over by hand to make sure the motor and rotor turn freely.
9. Install the four new carbon rotor blades carefully into the rotor.
Make sure the blades are in correctly and are the same width as your carbon rotor.
The M22456-2 PP205 and the M22456-3 rotor blades are wider than they are tall and must be installed correctly or the pump will not operate properly.
10. Install metal pump end cover and evenly tighten all 6 screws in a staggered pattern.
Make sure to once again turn the motor over by hand to make sure they are no obstructions and that the rotor has been serviced properly.
11. Install air filters and plastic end cover.
12. Re-connect air supply line.
13. Install plastic fan grill and upper shell.
14. Start unit and adjust pump pressure.
It is not required to have the HA1180 Air Pressure Gauge to set you heater to the proper running pressure, this can be done by increasing the air pump pressure until the nose cone of the heater in a nice glowing orange color and no harsh fumes are being presented by the heater.
The PP204 replaces the following part numbers:
Desa:M22456, M22456-1, M13614, M13614-1,HA3004, PP204
ProTemp: 70-022-0100
Pinnacle: 700220100
This is a partial list and does not include all of the part numbers that may have been replaced by the PP204 Carbon rotor Kit.
These parts were used in both High and Low pressure kerosene and diesel portable heaters manufactured by DESA International and private labeled for the following list of companies under some of the following brand names and sold at the following stores or retailers.
Sold at: Home Depot, Mennards, Lowe's, Sears, Ace Hardware, Builders Square, Cosco, Sam's Club, Walmart,WW Grainger, Portable Heater Parts, Master Distributors, Northern Hydraulics, NBMC, Sears, M & S Service Company Inc, FMConline, World Marketing and many other.
Sold as: Craftsman, Reddy heaters, Knipco, Dayton,Desa International,Master Portable heater,Universal Heaters,All-Pro,John Deere, Amoco, Koehring, Co-Op,Remington Kerosene and Diesel Heaters, Remington,Cenex, ty4075